|
How To Add A
Stud Wall Within an Existing Structure
Check Out The Wall Building Directions Below!

1. How to frame a new 2 x 4 stud wall within an existing
building: Determine the location and dimensions
of the new wall ensuring the wall will be straight and true to the
existing walls. It would be advisable to run the wall
perpendicular to the ceiling rafters or immediately along one rafter
for the length of the new wall; to locate the rafters, use a stud
finder. Mark each end of what will be one edge of your new wall on
the ceiling for the length of the new wall.
2. Using the two markings on the ceiling
where the new wall will run, use a straight edge to scribe a line on
the ceiling or snap a line connecting the two points to represent
one edge of a new top plate.
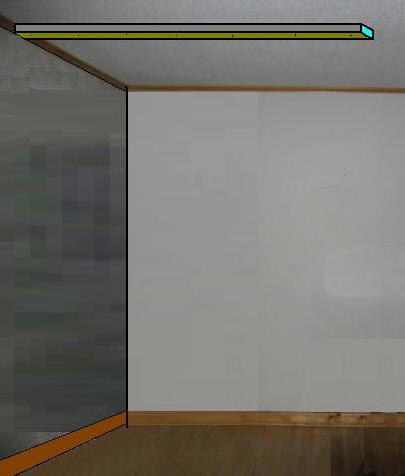
3. Cut the top plate to size and screw it in
place into the rafters with 3" screws; for the new wall,
cut/chisel away material or remove the crown molding and base
molding, as shown above.
4. Use a plumb line to scribe a pencil mark
on the floor straight down from the top plate; place a mark on the
floor at each end of where the new base plate will be installed and
snap a line between the two points.
5. Measure and cut a base plate and a second
top plate.
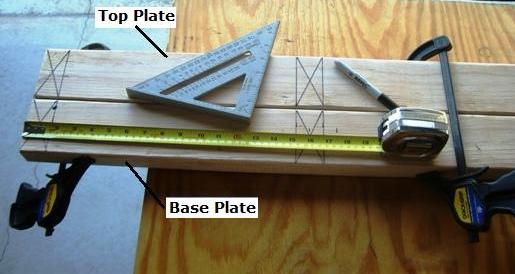
6. Place the base plate and 2nd top plate
together as shown on a flat surface or sawhorses with the edges
perfectly even and clamp them together and begin to layout the
studs. Begin at the end that will touch the existing wall and measure 1
1/2" (the thickness of a 2x4). Using a speed square, scribe a line and mark an "X" on both
boards in the 1 1/2" space (this will represent the placement of the
first stud).
7. Hook your tape measure on the edge of the
base/top plates and measure over 16" to the center of the next
stud; using your speed square,
scribe a line; measure 1 1/2" (3/4" on each side of the 16"
center mark) and scribe another line; mark an "X"
in each box on the top and base plate (this will represent the
placement of the 2nd stud).
8. Continue this same process measuring
every 16" "on center" and marking the stud placement for the entire length of
the wall.
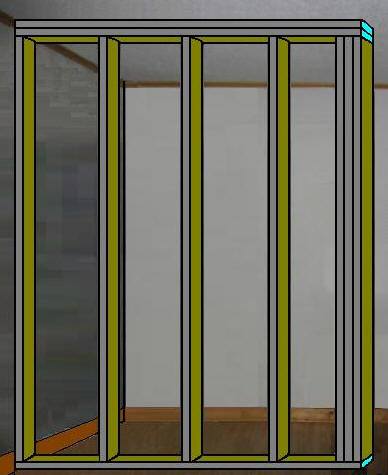
9. At the end of the new wall, place three
studs together for added strength and/or corner building; do this even though the end
measurement may not measure 16". Your layout stud markings are
now complete, remove the clamps.
10. Measure and cut your studs.
Measure the distance from the bottom of the first top plate, that is secured to the
ceiling, to the floor; minus 3" allowing for the thickness of the
2nd top plate, 1 1/2", and the base plate, 1 1/2", which together
equals 3".
11. Place on the floor the 2nd top plate and
the base plate on edge with the stud markings facing each other,
separated by the distance of the studs cut to length. Place the base
plate along the line drawn on the floor, so that it will be easy to
lift the completed wall into position. Place all the studs in
position.
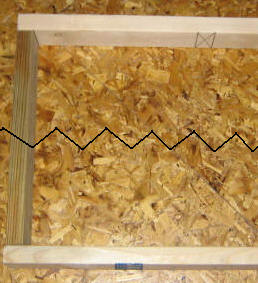
12. Place the first stud in position, lining
up the markings on both ends, as shown above; using 16 penny spikes, nail two spikes
through the base into the stud; continue this process until all the
studs are nailed to the base. Repeat this nailing process for the 2nd
top plate.

13. Stand the new wall upright using the 1st
top plate and the line on the floor as guide lines, slide the new
wall frame into place; nail or screw
the two top plates together. Stop and check for level and plumb;
continue to screw or nail the base plate to the floor; secure new
stud to existing wall. At the opposite end of the wall run, nail the
three studs to each other for strength.
14. With the wall in place, drill the
necessary 1" holes for electirc wire (12" up from Base Plate) or water pipes (16" up from Base Plate); add the wire and pipes; be sure
to nail any necessary metal pipe guard plates onto the studs.
15. Add the stud covering material of choice
and have a fun day. Access the following tips:
How to Frame
a Corner
How to Frame a
Door Rough Opening
How to Frame a
Window Rough Opening
How To Hang and Finish Drywall
More FREE Plans!
Picnic Table Plans
Gun Rack Plans
Bookcase Plans
Bird Feeder
Boot Rack
|