|
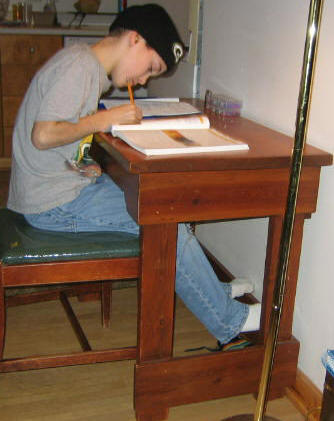
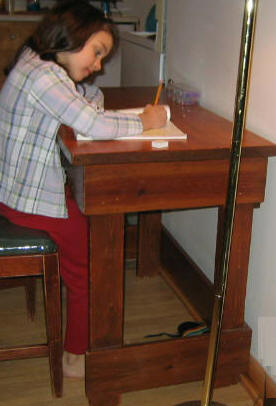
Building a desk is a project that can be fun and practical. This simple study desk for kids can be
customized to build a larger desk. This rugged, simple desk was built for my daughter's kids; it has withstood the abuse of
four different users and is still standing.
Material List:
If ole barn boards are not available, use one piece of 3/4" plywood, 2' x 4', for the Top Panel with
matching edging material.
One piece of 2 x 4 x 10' for the four legs.
Two pieces of 1" x 6" x 8' for the Top and Bottom Braces.
One pound, 1 5/8" Woodscrews.

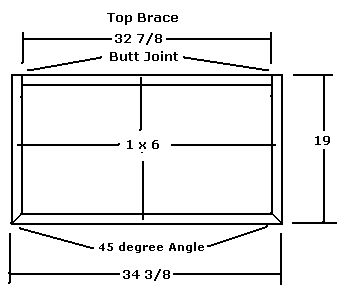
Step 1, Cut the Top Base Pieces - Select 1 x 6 x 10'; cut front piece @ 34 3/8 (45 degree cut
on each end); cut back piece @ 32 7/8 (straight cut on each end); cut two side pieces @ 19" (straight on back end and 45
degree on front end).
Using the wood screws, connect all four pieces; ensure all angles are 90 degrees to form a perfect rectangle.
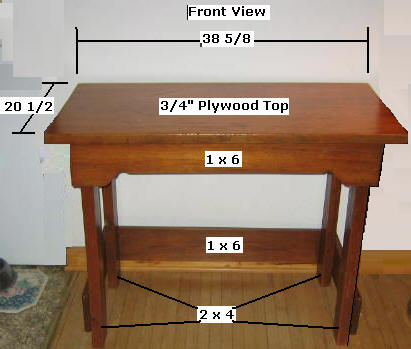
Step 2, Cut Top Panel and Assemble to the Top Brace - Select the 3/4" Plywood and cut it to
38 5/8" x 20 1/2" and apply edging material to all four sides. Attach the Top Panel to the Top Brace with screws
(counter sink the holes to fill later). Be certain that the back edge is flush; the overhang is in the front; the overhang
on the sides are equal distance to the Top Brace.
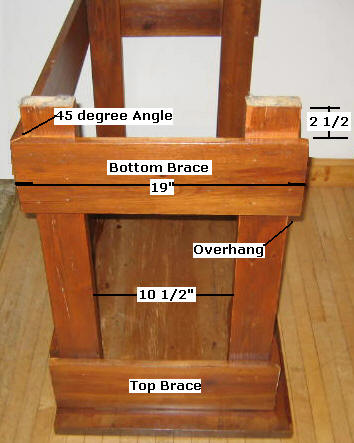
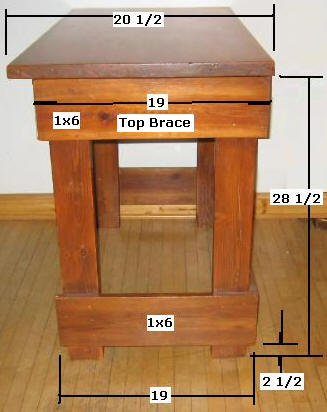
Step 3, Cut and Assemble the Leg Pieces - Select the 2x4x10'; cut four legs @ 28 1/2"; Select
the 1 x 6; cut the three, Bottom Brace pieces: Cut the back piece @ 34 3/8 (45 degree cut on each end); cut the two, side
pieces @ 19" (45 degree cut on back end and straight cut on the front end).
Select two, 2x4 leg pieces; lay them on a flat surface 10 1/2" apart (use a carpenter square to
ensure the legs are even); measure 2 1/2" from the bottom of the leg and place a mark on each leg; select the 1 x 6 x 19"
Side, Bottom Brace and attach it to the two legs, as shown above (the 45 degree angle in the back and the straight cut
overhang in the front). Repeat this process for the other set of legs.
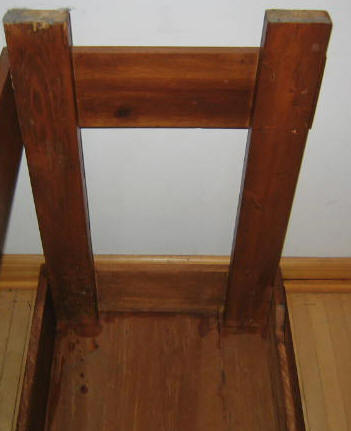
Step 4, Assemble the Legs to the Table Top Brace- Select the two leg assemblies and attach them to the
Table Top Brace, as shown above. Select the 1 x 6 x 34 3/8" Bottom, Back Brace and attach it, as shown above.
Step 5, Finish the Desk- Fill all holes with wood plugs and/or filler, sand, and apply stain/poly or
paint.
|